Leaf Monster[]

- HP: 20
During the fight, hold right while constantly slashing. Continue slashing for the remainder of the fight. When Leaf Monster throws away its leaf armor, throw all of your shurikens. If done properly, you should 1-cycle the boss.
Ruxxtin[]

- HP: 28
Ruxxtin has 2 attack patterns: high Ruxxtin and low Ruxxtin. It's completely random which one you get, and high Ruxxtin is the optimal pattern.
- High Ruxxtin: High Platform → Skull Ship → Floor x2 → Skull Ship → High Platform → Floor x1 → Repeat
- Low Ruxxtin: Floor x1 → Skull Ship → Floor x2 → High Platform → Skull Ship → Repeat
High Ruxxtin[]
1. For the easiest set up, jump on the left wall as soon as you gain control. Wait for rain animation to start and get hit. As you already bought the knockback recovery in Autumn Hills, use that to move forward instantly and slash + Cloudstep your way to the middle platform.
- Use shurikens while slashing.
2. If you didn't kill him, drop down to middle platform and finish him off.
Low Ruxxtin[]
1. Run to him and slash. Ruxxtin will then appear on the middle platform (skull).
- You can "floor jump" from Ruxxtin to middle platform.
- Grab the right wall and throw a shuriken before the platform starts moving.
2. If Ruxxtin is on the middle platform, knock him off asap. He will then fall to the left side of the room. Try to get in as many slashes as you can.
3. Ruxxtin will then teleport twice to the opposite side of the room (from Ninja's perspective). If you time it right, you can stand still and use a shuriken to hit him before his projectiles appear. Timing is the key.
4. After teleports, Ruxxtin will then move to the top platform, and he will 100% cast "acid rain."
- For the easiest set up, jump on the left wall as soon as you throw your shuriken when he was on the right side of the room. Wait when rain animation starts and get hit. As you already bought the knockback recovery in Autumn Hills, use that to move forward instantly and slash + Cloudstep your way to the middle platform.
Emerald Golem[]

- HP Golem Head: 40
- HP Golem Core: 8
- HP Wisp: 8
For the first phase, damage-boost to the center of the screen and slash the core down to 1 HP. Exit to the side of the screen and throw a shuriken at the core to begin the vulnerability phase. This allows a 2-cycle. In the second phase, you can wait at the bottom-center to start dealing damage with the sword as soon as the wisp enters the screen.
Queen of Quills[]

- HP: 45
Queen of Quills will jump to the center of the screen then onto a metal hook. Jump and do a well-timed attack while she's in the center of the screen, then Cloudstep and shuriken her off of the metal hook before she does anything, allowing for a quick-kill. When she's down to 1 HP, you cannot kill her until she does a spin-attack on the ground in the middle of the room. Optimally, wait near the exit door and throw a shuriken to finish her off.
Colos & Suses[]

- HP: 60 & 70
- Actual Death: 51 & 61
During their standard walk cycle, Colos (orange) is only vulnerable from the back, and Suses (green) is only vulnerable from the front. Use the Rope Dart while moving towards them to go straight through them, and use neutral Rope Darts to continuously attack them on their vulnerable side. Spam Rope Dart + attack for maximum damage.
Arcane Golem[]

- HP: 65
- Second Phase: 25 HP
Spam Rope Dart + attack on the side of Arcane Golem's head. Rope Dart gives invincibility frames, so once you're in the Rope Dart spamming animation, you're safe from the pink energy ball damage. After dealing enough damage to Arcane Golem, Arcane Golem claps its hands, which sends you flying away. Sometimes a well-timed Rope Dart while inputting movement direction towards Arcane Golem can prevent the majority of this knockback.
Alternatively, continuously attack and Cloudstep on the side of its head, no Rope Dart.
Manfred[]

- HP: 60
Fast strat: {to complete}
Barma'thazël[]

- HP: 70
At the start of the fight, you can throw one shuriken at a time to reset Barma'thazël's cycle. Get in close and count slashes, then throw a shuriken. The first shuriken should be thrown after the 4th hit, and each subsequent shuriken should be thrown after 11 successive hits.
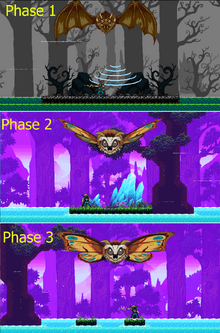
Butterfly Matriarch[]

- HP: 30
- Second Phase: 21 HP
- Third Phase: 11 HP
No Out-of-Bounds[]

The platforms exist for each phase and can be used without being seen. Before Butterfly Matriarch exits the first or second arena, you want to do downward glide attacks above her. Continue doing downward glide attacks as she exits the screen. In this way, you can do enough damage to skip the third phase.
Out-of-Bounds[]
Before the fight, you can do a shop death abuse in order to prevent the cutscene to trigger so you have free 1-cycle.
Clockwork Concierge[]

- HP Hearth: 45
- HP Head/Cannon/Trap : 45/13 each/25
Manfred's small fireball deals 1 HP and can be spammed. Manfred's charged fireball deals 5 HP and is piercing.
Use the charged fireball to hit multiples parts at the same time, and spam the small fireball when focusing one part.
Demon King[]

- HP: 40
- Actual Phase 1 Death: 39
You can use the fireball to get up to the Demon King without waiting for the rocket.
Phantom[]

- HP: 135
Phases:[]
Spirit Bomb[]
When Phantom starts the fight he typically floats into the air and then flies to a side of the room. When he is doing this, you want to use some fast movement and rope darts to get to the wall on the same side and quickly hit the ball he creates and throws at you. If you do it right, it should immediately collide and knock down Phantom and allow you to hit him relentlessly.
Lasers[]


When Phantom moves to the center and turns around to play his organ, the mask will appear to begin shooting lasers at you continuously for a while. If you perform repetitive rope dart attacks during this phase, you will not be hit by the lasers and will continue to do damage to Phantom.
Clone Jutsu[]
When Phantom teleports to the top of the screen, he will spawn clones of himself and will rotate like a wheel around the stage. The real Phantom can still be damaged but he will not break out of this attack until at least one full rotation. Once broken, Phantom will sit there for a brief second so you can continue to damage him.